Intro
I was tired of playing around with streaming settings that never quite fit my phone’s display perfectly. I wanted to maximize the resolution and refresh rate a la Apollo, which sets up virtual displays automatically for each client but is Windows only. After some trial and error, I figured out how to set up a virtual display under Ubuntu 24.04 (on Xorg) that perfectly matches my phone’s screen. Here’s how I did it.
Pre-requisites
- Sunshine server installed
- Ubuntu with Xorg (not Wayland)
- Nvidia GPU with proprietary or open drivers (not nouveau)
Disabling Wayland
Before proceeding, verify you’re on wayland or x11 by running echo $XDG_SESSION_TYPE.
If you’re on Wayland, disable it by editing /etc/gdm3/custom.conf, and uncommenting WaylandEnable=false. Your configuration should look like:
[daemon]
# Uncomment the line below to force the login screen to use Xorg
WaylandEnable=false
Apply the changes by running sudo systemctl restart gdm3 or rebooting your host.
Writing the xorg.conf file
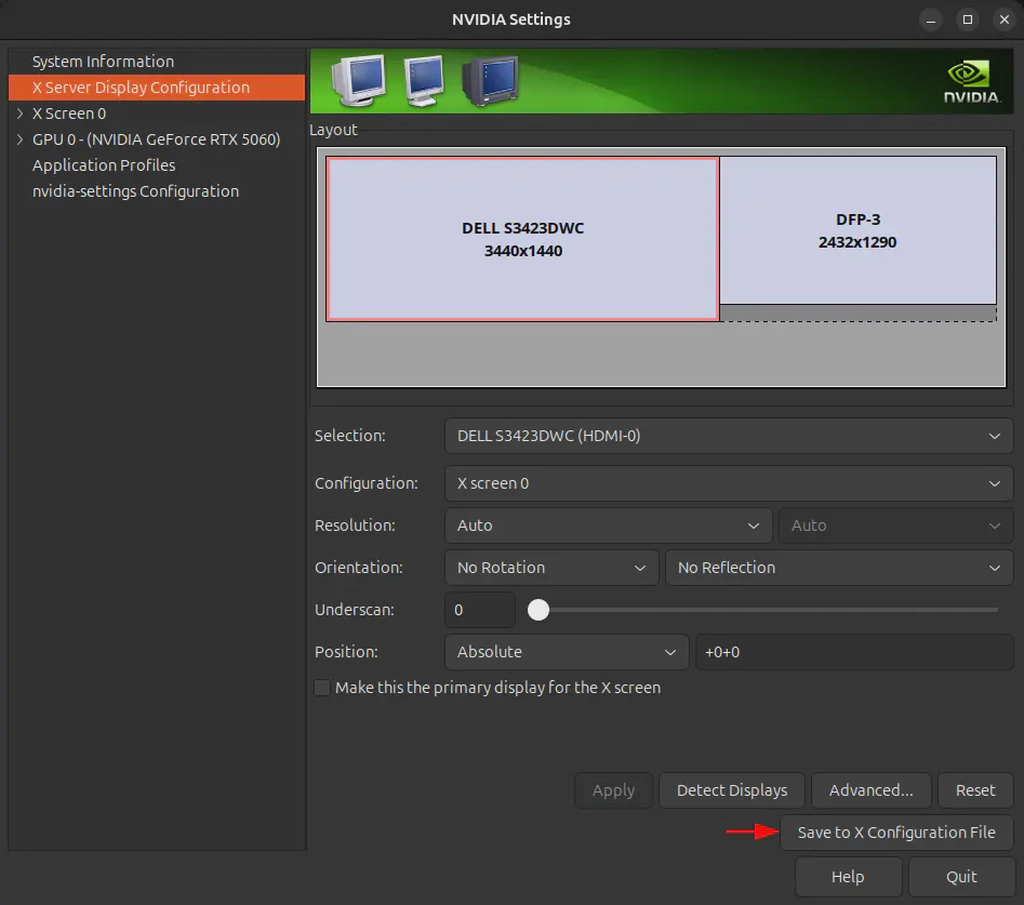
First, make sure you have a xorg.conf generated for your setup. If there’s no /etc/X11/xorg.conf file, you’ll need to generate one using Nvidia X Settings.
Open the application and navigate to “X Server Display Configuration”, then click on “Save to X Configuration File”. If you get an error saying “Unable to open X config file ‘/etc/X11/xorg.conf’ for writing”, close the application, run it as root sudo nvidia-settings and try saving the configuration again.
The generated file should look something like this:
Section "ServerLayout"
    Identifier     "Layout0"
    Screen      0  "Screen0" 0 0
    InputDevice    "Keyboard0" "CoreKeyboard"
    InputDevice    "Mouse0" "CorePointer"
    Option         "Xinerama" "0"
EndSection

Section "Files"
EndSection

Section "Module"
    Load           "dbe"
    Load           "extmod"
    Load           "type1"
    Load           "freetype"
    Load           "glx"
EndSection

Section "InputDevice"
    Identifier     "Mouse0"
    Driver         "mouse"
    Option         "Protocol" "auto"
    Option         "Device" "/dev/psaux"
    Option         "Emulate3Buttons" "no"
    Option         "ZAxisMapping" "4 5"
EndSection

Section "InputDevice"
    Identifier     "Keyboard0"
    Driver         "kbd"
EndSection

Section "Monitor"
    Identifier     "Monitor0"
    VendorName     "Unknown"
    ModelName      "DELL S3423DWC"
    HorizSync       30.0 - 160.0
    VertRefresh     48.0 - 100.0
    Option         "DPMS"
EndSection

Section "Device"
    Identifier     "Device0"
    Driver         "nvidia"
    VendorName     "NVIDIA Corporation"
    BoardName      "NVIDIA GeForce RTX 5060"
EndSection

Section "Screen"
    Identifier     "Screen0"
    Device         "Device0"
    Monitor        "Monitor0"
    DefaultDepth    24
    Option         "Stereo" "0"
    Option         "nvidiaXineramaInfoOrder" "DFP-0"
    Option         "metamodes" "3440x1440_100 +0+0"
    Option         "SLI" "Off"
    Option         "MultiGPU" "Off"
    Option         "BaseMosaic" "off"
    SubSection     "Display"
        Depth       24
    EndSubSection
EndSection
You should make a copy so you can revert back to it by running sudo cp /etc/X11/xorg.conf /etc/X11/xorg.conf.bak. To add the virtual display, you’ll need to modify the “Device” and “Screen” sections. Here’s what worked for me:
Section "Device"
    Identifier     "Device0"
    Driver         "nvidia"
    VendorName     "NVIDIA Corporation"
    BoardName      "NVIDIA GeForce RTX 5060"
    Option         "AllowEmptyInitialConfiguration" "True"
    Option         "ConnectedMonitor" "DFP-0, DFP-3"
    Option         "UseEDID" "DFP-0:TRUE, DFP-3:FALSE"
    Option         "UseEDIDDPI" "DFP-0:TRUE, DFP-3:FALSE"
    Option         "UseEDIDFreqs" "DFP-0:TRUE, DFP-3:FALSE"
    Option         "ModeValidation" "DFP-3: NoMaxPClkCheck, NoEdidMaxPClkCheck, NoMaxSizeCheck, NoHorizSyncCheck, NoVertRefreshCheck, AllowNonEdidModes, NoVesaModes, NoPredefinedModes"
    Option         "Coolbits" "28"
EndSection

Section "Screen"
    Identifier     "Screen0"
    Device         "Device0"
    Monitor        "Monitor0"
    DefaultDepth    24
    Option         "Stereo" "0"
    Option         "nvidiaXineramaInfoOrder" "DFP-0"
    Option         "metamodes" "HDMI-0: 3440x1440_100 +0+0, DP-2: 1024x768_60 +3440+0"
    Option         "SLI" "Off"
    Option         "MultiGPU" "Off"
    Option         "BaseMosaic" "off"
    SubSection     "Display"
        Depth       24
        Modes      "3440x1440_100" "1024x768_60"
    EndSubSection
EndSection
With this configuration, you’re telling Xorg that there’s a device connected on DFP-3 and to render a screen there, your virtual display. In my case, DFP-0 is my connected HDMI port (referred to as HDMI-0) and DFP-3 is an unconnected DisplayPort (referred to as DP-2). Make sure to write the appropriate coordinates for your virtual display. In my case, I wanted it to the right of my real display, so I placed it at +3440+0.
Update on 2025-11-22: After troubleshooting a reader’s setup, we found out that only certain DisplayPort outputs were usable for this virtual display configuration. His main display is connected to DP-2 (DFP-3) and after some trial and error we identified DP-0 (DFP-1) as the only port that could be attached to a virtual monitor. It is also common for graphic cards to present more ports than what is physically present so make sure to choose accordingly. Expect some trial and error until you get a working configuration.

To find the names of your ports, check the Xorg log file, cat ~/.local/share/xorg/Xorg.0.log. You’ll see output similar to:
[ 10107.991] (--) NVIDIA(GPU-0): DELL S3423DWC (DFP-0): connected
[ 10107.991] (--) NVIDIA(GPU-0): DELL S3423DWC (DFP-0): Internal TMDS
[ 10107.991] (--) NVIDIA(GPU-0): DELL S3423DWC (DFP-0): 600.0 MHz maximum pixel clock
[ 10107.991] (--) NVIDIA(GPU-0):
[ 10107.991] (--) NVIDIA(GPU-0): DFP-1: disconnected
[ 10107.992] (--) NVIDIA(GPU-0): DFP-1: Internal DisplayPort
[ 10107.992] (--) NVIDIA(GPU-0): DFP-1: 2380.0 MHz maximum pixel clock
[ 10107.992] (--) NVIDIA(GPU-0):
[ 10107.992] (--) NVIDIA(GPU-0): DFP-2: disconnected
[ 10107.992] (--) NVIDIA(GPU-0): DFP-2: Internal TMDS
[ 10107.992] (--) NVIDIA(GPU-0): DFP-2: 165.0 MHz maximum pixel clock
[ 10107.992] (--) NVIDIA(GPU-0):
[ 10108.006] (--) NVIDIA(GPU-0): DFP-3: disconnected
[ 10108.006] (--) NVIDIA(GPU-0): DFP-3: Internal DisplayPort
[ 10108.006] (--) NVIDIA(GPU-0): DFP-3: 2380.0 MHz maximum pixel clock
[ 10108.006] (--) NVIDIA(GPU-0):
[ 10108.006] (--) NVIDIA(GPU-0): DFP-4: disconnected
[ 10108.006] (--) NVIDIA(GPU-0): DFP-4: Internal TMDS
[ 10108.006] (--) NVIDIA(GPU-0): DFP-4: 165.0 MHz maximum pixel clock
[ 10108.006] (--) NVIDIA(GPU-0):
[ 10108.006] (--) NVIDIA(GPU-0): DFP-5: disconnected
[ 10108.007] (--) NVIDIA(GPU-0): DFP-5: Internal DisplayPort
[ 10108.007] (--) NVIDIA(GPU-0): DFP-5: 2380.0 MHz maximum pixel clock
[ 10108.007] (--) NVIDIA(GPU-0):
[ 10108.007] (--) NVIDIA(GPU-0): DFP-6: disconnected
[ 10108.007] (--) NVIDIA(GPU-0): DFP-6: Internal TMDS
[ 10108.007] (--) NVIDIA(GPU-0): DFP-6: 165.0 MHz maximum pixel clock
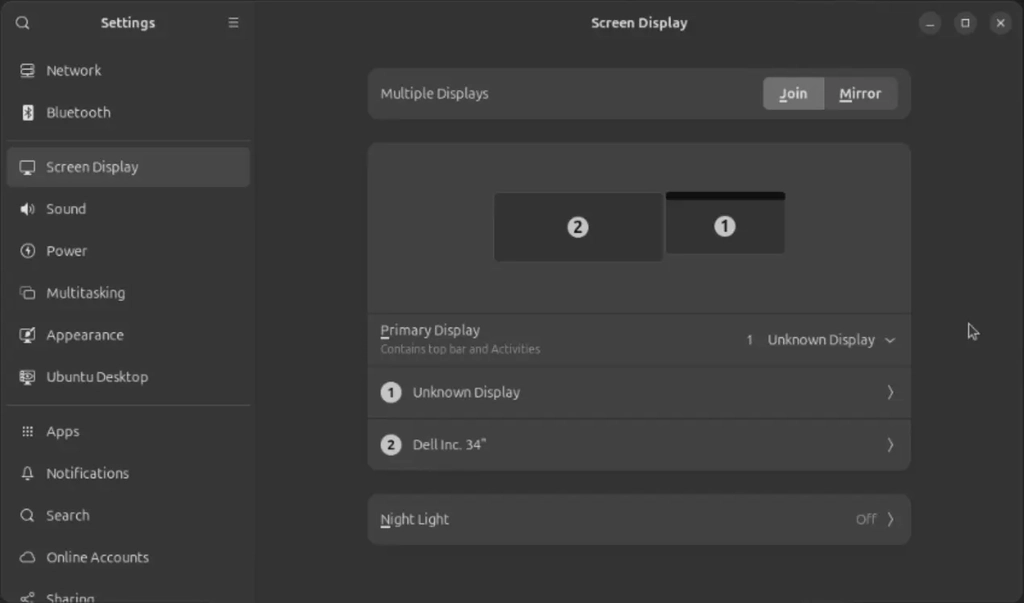
After making these changes, reboot your PC. You should now have a virtual display. You can verify this in Screen Display Settings where you’ll see a second monitor.
Keep the virtual display resolution as a standard one for now, as non-standard resolutions require additional configuration. If your streaming device uses a standard resolution (like 1920x1080 or 2560x1440), you can skip to the “Configuring Sunshine” section.
Setting a custom resolution
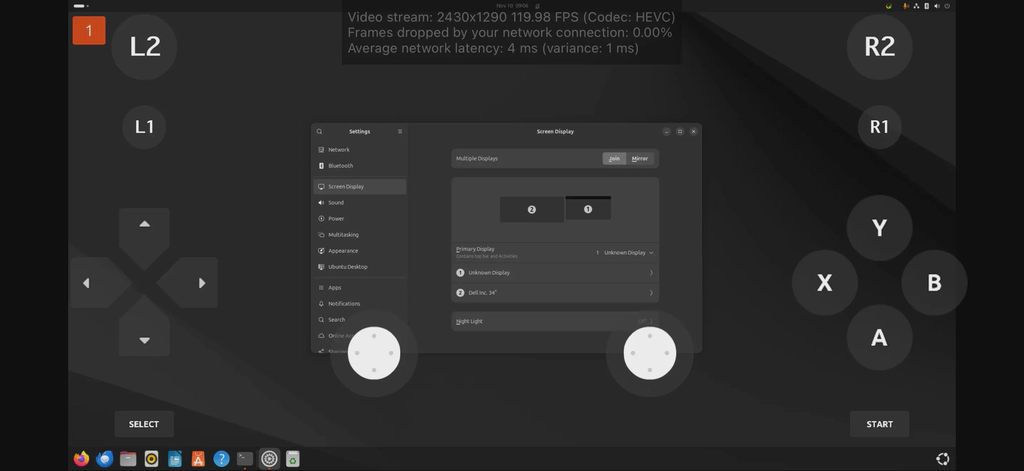
According to the moonlight client, my streaming device has a safe resolution of 2430x1290, definitely a non-standard one. To set your virtual display to a non-standard resolution, you first need to generate a modeline.
$ cvt 2430 1290 120

# Outputs:
Modeline "2432x1290_120.00"  560.75  2432 2640 2904 3376  1290 1293 1303 1385 -hsync +vsync
Where 2430 is your width, 1290 is your height and 120 is your refresh rate.
Next, create a script at /usr/sbin/set-virtual-display.sh. Don’t forget to make it executable with chmod +x.
#!/bin/bash

# This may look a bit different depending on your resolution
# I removed the .00 from the name
xrandr --output DP-2 --newmode "2432x1290_120" 560.75 2432 2640 2904 3376 1290 1293 1303 1385 -hsync +vsync 2>/dev/null
xrandr --addmode DP-2 2432x1290_120
xrandr --output DP-2 --mode 2432x1290_120 --right-of HDMI-0
echo "Virtual display configured at 2432x1290@120Hz"
Test the script to make sure the resolution works. To make it run automatically on boot, create an autostart file (you could also create a oneshot service with systemd):
# create the directory
$ mkdir ~/.config/autostart/

# populate the .desktop file
$ cat > ~/.config/autostart/configure-virtual-display.desktop <<'EOF'
[Desktop Entry]
Type=Application
Exec=/usr/sbin/set-virtual-display.sh
Hidden=false
NoDisplay=false
X-GNOME-Autostart-enabled=true
X-GNOME-Autostart-Delay=5
Name=Configure Virtual Display
Comment=Sets virtual display to a custom resolution
EOF
Reboot your PC and check that the custom resolution is applied correctly. You can verify this in Screen Display Settings or by checking the Xorg log file.
Configuring Sunshine
By default, Sunshine picks your main display to stream. To ensure it uses the virtual display when streaming, we need to add some commands under “Command Preparations” in Sunshine’s configuration.
In the Sunshine web interface, navigate to Configuration -> Applications. Under any app you want to stream (or create a new one), add the following:
Do Command: xrandr --output <virtual display, like DP-2> --primary
Undo Command: xrandr --output <actual display, like HDMI-0> --primary
This ensures that your virtual display is set as primary when streaming starts, and switches back to your main display when streaming ends. Games and applications will launch on the virtual display, giving you perfect resolution matching for your streaming device.

Please note that the black bars surrounding my stream are due to the notch on my phone (hence the safe area).
Done!
After setting everything up, you should have a virtual display that’s automatically selected when streaming through a Moonlight-compatible client. Your games will render at the exact resolution of your device, giving you the best possible streaming experience!
