
Intro
I set up scrutiny to monitor the drives in my Proxmox host. I like having access to all the SMART data in my drives in one single spot, so I decided to include my NAS’ drives as well. This is how I did it.
Pre-requisites
Scrutiny depends on smartctl v7+ which, unfortunately, my NAS did not have. To check the version of smartctl that your NAS has installed, SSH into it and issue the command /usr/bin/smartctl -i. If your smartctl version is lower than 7, you will need to install Entware. For instructions to do so, please visit this link.
Installing an updated version of smartctl
To install an updated version of smartctl, SSH into your NAS and as root execute the command opkg install smartmontools. After this, you will find smartctl under /opt/sbin/smartctl. You can call it with the -i flag to make sure the version installed is at least 7.
Downloading the collector
To download the latest binary, you can head over here and copy the link for the appropriate architecture. To find your architecture, you can issue the command uname -m.
After copying the link, SSH back into your NAS. Create the appropriate folder structure, like /opt/scrutiny/bin. Keep in mind that if you have not installed Entware, your /opt directory may get overwritten with future system updates. Now, cd into the newly created directory and issue the command wget <binary link>. After its downloaded, you should give it the appropraite permissions by executing chmod +x <binary>. You may need to issue these commands as root.
Configuration file
You will need to create a configuration file, collector.yaml, inside /opt/scrutiny/config. This is to replace which smartctl binary will be used, as the one shipped with DSM lives under /sbin and the one installed by Entware is under /opt. You can take a look at all the configuraiton options in the example configuration here. My configuration looks like:
version: 1
host:
  id: "nas"

api:
 endpoint: 'http://<master ip>:<port>'

commands:
  metrics_smartctl_bin: '/opt/sbin/smartctl'
You can test your configuration by executing the command /opt/scrutiny/bin/<collector binary> run --config /opt/scrutiny/config/collector.yaml. If everything was set up correctly, your device should appear in the scrutiny dashboard.
Setting up the scheduled task
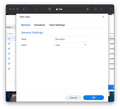
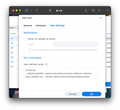
Enter the WEB GUI and navigate to Control Panel -> Task Scheduler. In here select Create -> Scheduled Task -> User-defined script. Under General, name it something like “scrutiny” and make sure enabled is checked. Under Schedule, make sure its run daily and its run every 15 minutes. Under task settings, paste the following in the command textbox.
#!/bin/sh
. /opt/etc/profile; /opt/scrutiny/bin/<collector binary> run --config /opt/scrutiny/config/collector.yaml
Your settings should look like:

Done!
Once everything is set up, the collector installed in your NAS will update your server with smart data every 15 minutes.