
Intro
Some of my self-hosted services don’t play nicely with Cloudflare proxying. This has led me to use DNS and forgo Cloudflare’s protection. Many of the guides out there require pfBlockerNG or the use of scripts that authenticate to pfSense via SSH. This guide will help you integrate Fail2Ban with pfSense using only alias lists.
Serving the banlist
You need a web server configured to serve a txt file. There are multiple ways you can achieve this but in this case, we’ll install an Apache server on a Debian-based Docker host.
To do that, you start with the following command: sudo apt-get update && sudo apt-get install apache2
Then, modify the default site at /etc/apache2/sites-available/000-default.conf and replace its contents with the following.
<VirtualHost *:80>
    ServerName banlist.local
    DocumentRoot /var/www/html

    <Directory "/var/www/html">
        Options Indexes FollowSymLinks
        AllowOverride None
        Require all granted

        <Files "*.txt">
            ForceType text/plain
            Header set Content-Type "text/plain; charset=utf-8"
        </Files>
    </Directory>

    <Location "/banlist.txt">
        Header set Cache-Control "no-cache, no-store, must-revalidate"
        Header set Pragma "no-cache"
        Header set Expires "0"
    </Location>

    <Location "/">
        # Only allow GET requests
        <LimitExcept GET>
            Require all denied
        </LimitExcept>
    </Location>
</VirtualHost>
Afterward, create an empty banlist.txt file, touch /var/www/html/banlist.txt and add the appropriate permissions by running chown www-data:www-data /var/www/html/banlist.txt. Finally, restart the server with sudo systemctl reload apache2.
If you navigate to http://<your-host>:80/banlist.txt, you should get an empty file.
Adding the Fail2Ban Action
First, make sure that your Fail2Ban instance has access to the banlist. You can achieve this by adding the volume entry, - /var/www/html/banlist.txt:/data/banlists.d/banlist.txt. This maps the banlist.txt file found on the host to /data/banlists.d/banlist.txt in the Fail2Ban container.
Then, inside actions.d, create and edit a new configuration file, like banlist.conf. Copy the following contents into it.
[Definition]
actionstart = touch /data/banlists.d/banlist.txt
actionstop =
actioncheck =
actionban = if ! grep -q "<ip>" /data/banlists.d/banlist.txt; then echo "<ip>" >> /data/banlists.d/banlist.txt; fi
actionunban = sed -i '/^<ip>$/d' /data/banlists.d/banlist.txt
Then modify jail.d/jail.local and add the banlist action under the [DEFAULT] section. It should look something like:
[DEFAULT]
ignoreip = 10.0.0.0/8, 192.168.0.0/16, 127.0.0.1, 172.0.0.0/8
action = cloudflare
         banlist
Finally, restart your container for the changes to take effect.
Adding the Alias in pfSense
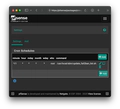
In your pfSense web interface, navigate to Firewall->Aliases and click on Add. In the Properties section, enter a name like “Fail2Ban”, make sure the Type is set to URL Table (IPs). In the URL Table (IPs) section add the host URL, make sure the netmask is set to 128, and optionally add a meaningful description. The end result should look similar to this blog’s cover picture.
Adding the update script
By default, aliases are updated every 24 hours. This is not particularly useful for something like a blocklist, as we want the changes to propagate as fast as possible. To update the alias list on demand, you need to add a script in your pfSense machine. You can create a file under /usr/local/sbin/update_fail2ban_list.sh and give it the appropriate permissions by running chmod +x /usr/local/sbin/update_fail2ban_list.sh.
Paste the following contents in there.
/usr/bin/touch -t 1001031305 /var/db/aliastables/Fail2Ban.txt
/usr/bin/nice -n20 /etc/rc.update_urltables now forceupdate
You can test this by adding an IP entry to the ban list, checking the alias in pfSense to confirm it hasn’t appeared yet, executing the script, and finally checking the alias list again to verify the IP is now present.
To make sure the list is updated constantly, add a cron job under Services->Cron, matching the configuration as shown in the picture below.
Adding the firewall rule
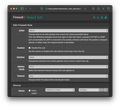
To tie it all together, you need a rule that will read the alias list and block traffic coming from any of the IPs listed there. Navigate to Firewall->Rules and click on Add with the arrow pointing up. Make sure the Action is Block, Interface set to WAN, Address Family set to IPv4, Protocol set to Any, Source set to Address or Alias list with the Fail2Ban alias. Leave everything else as default and click on Save.
The settings should look like:
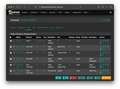
The Firewall Rules page should look like:
Done!
Next time Fail2Ban detects an unwanted IP and adds it to the blocklist, pfSense will block traffic to it within 1 minute.